


P1 Circuit
4.5 MILES
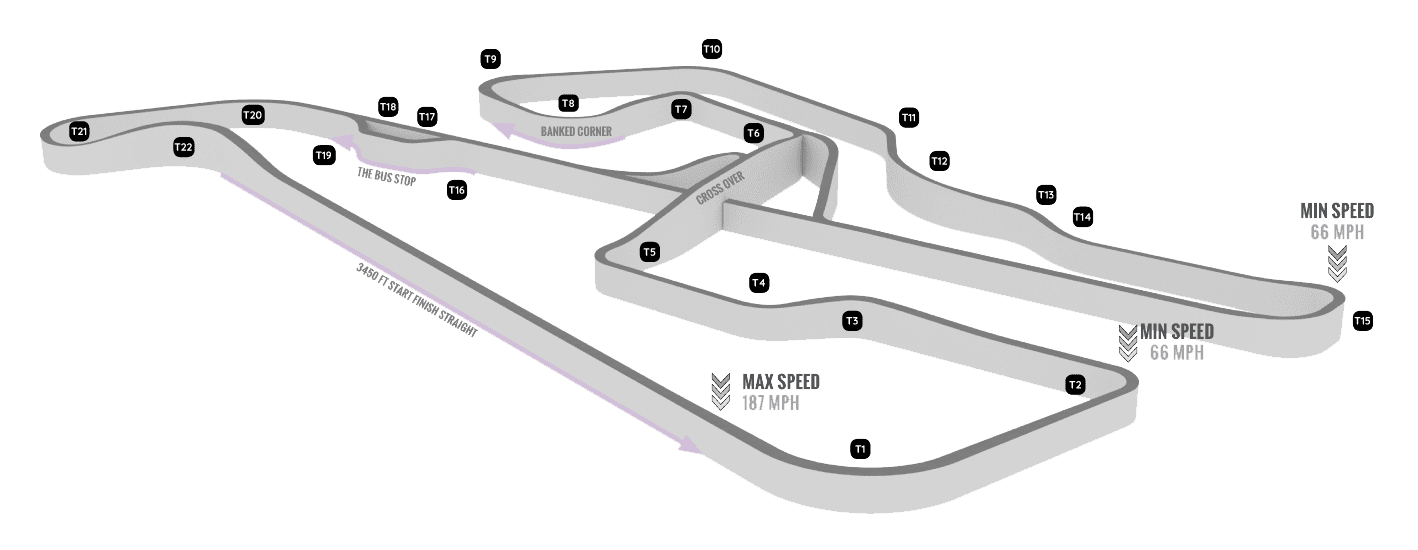
The P1 Circuit is the crown jewel of P1 Motor Club, reserved primarily for our members. Shaped by world-class designers and sharpened with feedback from dozens of gentleman and pro drivers, it fuses favorite corners and signature sections from the most beloved tracks across the globe into one extraordinary, 4.5-mile monster circuit with dramatic elevation changes, including an F1 Suzuka-inspired bridge with a figure-8 layout.
While members will be tearing into the Treasure Coast, Karting, Drift, and Rallycross circuits beginning in 2026, our flagship P1 Circuit will continue to take shape. Final paving is slated for late 2026, with a grand opening set for Spring 2027—an arrival worth the wait.
The P1 Circuit delivers fast, flowing sequences, a blind crest, dramatic elevation changes, late apex challenges, and high-banked corners that reward commitment. Every section is bordered by wide grass verges, with ample asphalt and grass runoff zones in most corners—inviting drivers to push harder in a safer, more controlled environment than traditional circuits that leave little margin for error. Runoff areas are designed to let drivers recover and rejoin without advantage, with grass return strips preventing safety zones from becoming the preferred racing line.
From the very first lap, newcomers feel the thrill of its rhythm and speed. Yet as experience builds, so does the realization that small mistakes in key corners cascade through entire sequences, costing precious time. The P1 Circuit is approachable to drive but endlessly demanding to master—an arena where precision separates the quick from the truly fast.

Join IMSA and SRO GT Champion Kenny Murillo on a hot lap simulator tour. (NOTE: buildings are rudimentary placeholders for now).
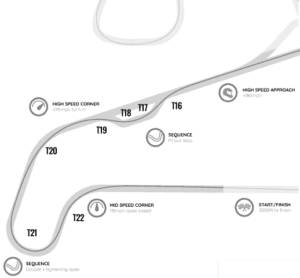
Tour the P1 International Course Configuration
1
SEQUENCE 1 (T1-T2)SEQUENCE 1 (T1-T2)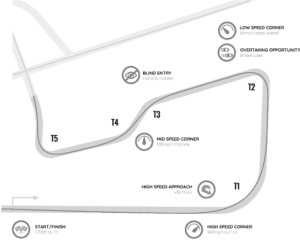
T1 is located 1755ft from the start line and forms the first turn of this primary sequence. T1 is large and open to allow drivers with more downforce, better tires, or simply more talent to pull away from the pack before the huge brake into T2. For a race event where vehicles and drivers are of a relatively similar level, the open nature of T1 will allow the drivers to stay close and drive the vehicle ahead under the brakes into T2.
2
SEQUENCE 2 (T2-T5)SEQUENCE 2 (T2-T5)
On exit from T2, cars will start their climb toward T3, where a blind crest into a flat-out chicane will benefit the brave. Drivers must rely on their sighting laps to believe that there is no need to brake on the approach to T3.
As the crest opens out, drivers will be gifted with the view of T3 and T4. Over time, P1 members will learn where to line their cars to ensure they maintain the maximum speed through this downhill sequence.
On exit from T4, drivers will feel the track compress before the elevation starts to rise again toward the circuit crossover. Although T5 remains a low speed corner, drivers must be careful not to defend too heavily as every mph lost around T5 will be punishing all the way to T7.
3
SEQUENCE 3 (T5-T7)SEQUENCE 3 (T5-T7)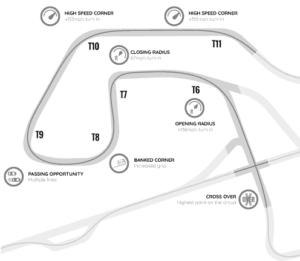
As drivers begin their climb up and over the bridge, the second half of the circuit comes into view. The sequence, while not having the highest approach speed, will feel like one of the fastest sequences on the circuit.
The tight yet opening radius nature of T6 rewards the brave, as a well placed aggressive turn will allow the driver maximum momentum on the run towards T7.
4
SEQUENCE 4 (T7-T9)SEQUENCE 4 (T7-T9)
T7 to T9 is the P1 Circuit’s technical sequence, which stands to make or break not only the following corner sequence, but the entire run from T10 to T15.
The fast approach to T7 straightens up for a hard brake event.
Drivers must focus on moving over to track left to set up for T8, mistakes through T7 will make this very difficult, compromising their line through the following turn. T8 features increased corner superelevation, giving an inspiring feeling of grip allowing drivers to build speed through this sequence towards T9.
A short sprint toward T9 presents a medium camber, complex corner radius with a sharp apex but wide entry and exit. This geometry is aimed to present two options of attack; turn in early and suffer a speed deficit for the next 5 corners, or maximize corner exit speed and leave the inside line wide open for the car following.
5
SEQUENCE 5 (T9-T11)SEQUENCE 5 (T9-T11)
On the exit from T9 lies a sequence that is sure to become a favorite among many P1 club members. The sequence is fast and flowing, combining 2 extremely fast, open corners. While this nature of corner sequence is unlikely to produce large time variations among professional race drivers, it can often be an area for amateur drivers to notice big improvements. Building up the confidence to take this sequence without using the brakes, or eventually without lifting off the throttle, will allow members to quickly shave seconds off their lap times.
6
SEQUENCE 6 (T11-T15)SEQUENCE 6 (T11-T15)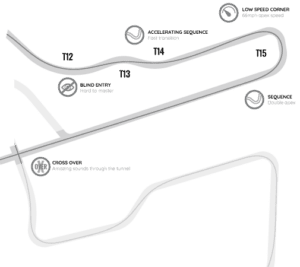
As drivers exit T11, the flat out back sequence becomes rather more complicated. As drivers exit T12 they will be in search of the apex of T13. Achieving the right line through here allows drivers to accelerate from the apex of T12 all the way through to the next two corners, quickly switching direction to make it through T13 and T14 onto the straight approach to the double apex hairpin.
To make the most of this sequence, drivers will have to master braking points and turn in locations without being able to rely on their eyes to spot the apex. Although initially it may seem impossible to get 100% right, drivers who frequently visit P1 Motor Club will find the perfect combination of brakes and turning angle. This will, in turn, reward them with more speed and the perfect line through T14 and set up the outside approach and straight line braking into T15.
T15 is a double apex right hand turn with subtle banking. This sequence will feel different for different vehicles, as those with higher grip will attack the corner very differently from those with low grip high power.
One thing is for sure though, T15 is possibly the most important corner of the circuit. With a long straight to follow, every additional mph gained on corner exit will help to secure that vital position before the soon to be famous P1 Bus Stop.
7
SEQUENCE 7 (T15-T19)SEQUENCE 7 (T15-T19)
As drivers straighten the car on the exit from T15, they will apply full throttle as they point the wheel towards the bridge and attack the back straight. Over 1/3 mile (650m) later, every motorsports enthusiast’s heart skips a beat as the race cars roar through the tunnel presenting the P1 Bus Stop.
Slightly hidden by a crest, the P1 Bus Stop creates a thrilling high speed double direction change, which will feel like its sole purpose is to make the driver lose control, but once mastered, it will become a well-choreographed dance across the asphalt.
8
SEQUENCE 8 (T19-FINISH)SEQUENCE 8 (T19-FINISH)
The P1 Bus Stop opens into an open left-hand corner, T20, which will reward a good exit and allow for drivers to generate a speed differential for a penultimate corner dive into T21. To encourage the pass, T21 is a subtle late apex corner.
To add to the drama, T21 and T22 combine to create a complex sequence whereby throttle restraint around T21 allows for a better line on the approach to T22. The intent is such that a well-considered drive around T21 will allow a driver to maintain full throttle from the exit all the way along the start finish straight to T1.
Tackling T21 too aggressively, however, will be devastating for a good lap time, squeezing the racing line around T22 to the point that a lift or even a touch of the brakes will ruin straight line speed for the next 2/3 of a mile (3450ft).
Course Configurations
| P1 International | P1 East | P1 West | |
|---|---|---|---|
| DESIGN STANDARDS* | FIA Grade 2 | FIA Grade 2 | FIA Grade 3 |
| TRACK LENGTH | 4.2 miles | 1.7 miles | 2.2 miles |
| AVERAGE SPEED** | 127 mph | 111 mph | 118 mph |
| MAX SPEED** | 187 mph | 149 mph | 177 mph |
| LAP TIME** | 1 min 53 sec | 56 sec | 1 min 9 sec |
| LONGEST STRAIGHT | 3,280 ft | 1,480 ft | 3,280 ft |
| TOTAL LENGTH OF STRAIGHTS | 14,000 ft | 7,926 ft | 4,623 ft |
| CORNERS | 22 | 12 | 15 |
| FEATURES | Circuit Crossover | Bus Stop | High Banked Corner | 1-mile Esses | High Banked Corner, 1-mile Esses, Blind Crest | Circuit Crossover | Corkscrew Inspired Corner w/Dramatic Elevation Drop |
| SUPPORT INFRASTRUCTURE | Member Paddock | Clubhouse | Non-competition East Paddock | Member Paddock | Clubhouse |
*P1 Circuit design guided by FIA Grade II standards; FIA homologation not complete. **Based on F2 racecar simulation


