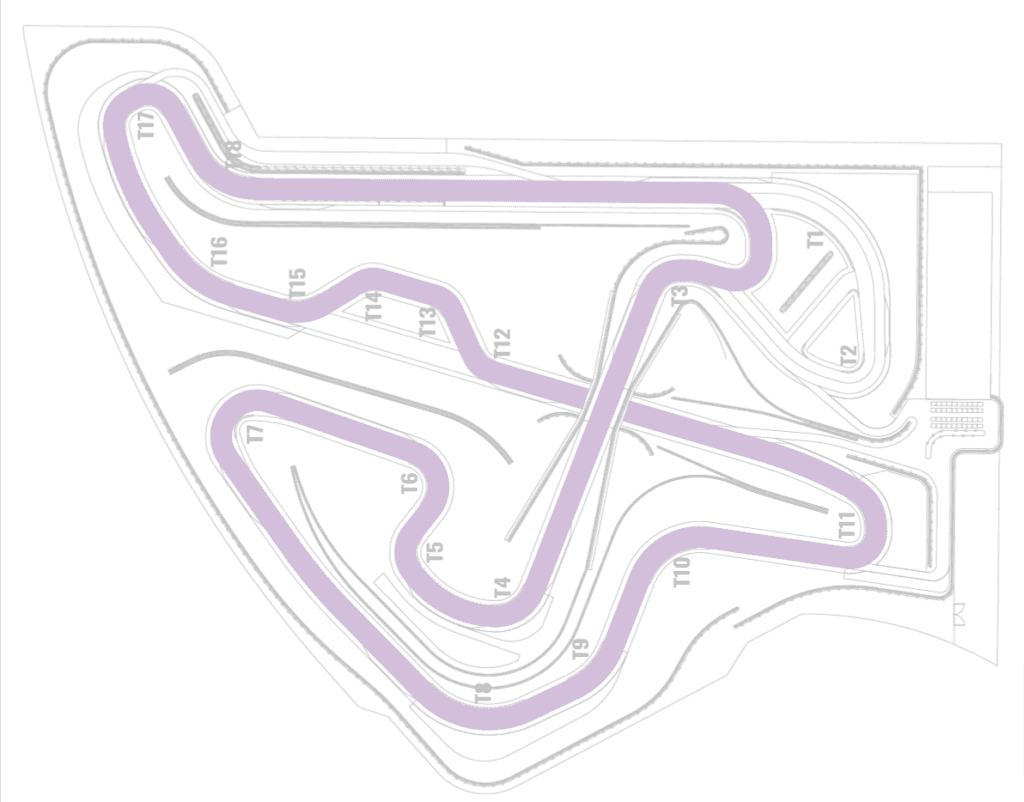


P1 Karting Circuit
1.2 MILES
Ideal for beginners, young racers, and karting enthusiasts, the P1 Karting Circuit takes heavy inspiration from the P1 Circuit, with the aim of creating engaging conversation between people of different age and ability ranges.
The P1 Karting Circuit sits on the inside of the Treasure Coast Circuit, where the large events center doubles as the operations building for rental karting and race control and timing systems. The building will provide great views over the P1 Karting Circuit, only obscured by the circuit’s crossover.
The P1 Kart Building offers two pit lanes from a shaded handover area within the proximity of the building. The first pit lane is situated directly in front of the event center to ensure parents can keep a close eye on their little future F1 stars.
The second pit lane is primarily for rental/corporate kart use and provides direct access onto the back straight at approximately halfway around the lap. While this seems counterintuitive, starting halfway around the lap reduces time spent getting the karts to the grid and back to the pit lane after a race just half a lap from the start-finish line, speeding up time from the end of one session and the start of another.
Tour the P1 Karting Circuit

1
SEQUENCE 1 (Starting Grid)SEQUENCE 1 (Starting Grid)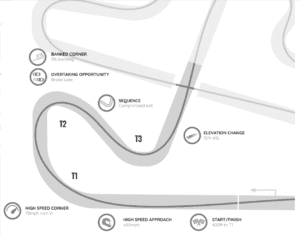
A level grid and start line await the drivers where they can concentrate on the lights, rather than working on rolling forward or backward on the grid.
2
SEQUENCE 2 (T1-T3)SEQUENCE 2 (T1-T3)
Once the lights go out and the drivers cross the start line, the track starts to immediately drop down into the bowl sequence of T1 and T2. This gradient provides a sudden boost to karts as they set off from a standing or slow rolling start. T1 mimics the open and fast nature of the P1 Circuit, but quickly merges into T2.
The driver will be coming in fast, and will have not negotiated a turning and braking maneuver. T2 incorporates high-corner banking to increase grip and discourage someone from trying to overtake around the outside.
As karts exit T2, the track starts to rise towards T3 and the circuit crosses over. A poor exit from T2 will be costly as karts struggle to gain momentum uphill. T3 is a slow corner to maximize safety as the track edges close in for the circuit crossover.
3
SEQUENCE 3 (T4-T7)SEQUENCE 3 (T4-T7)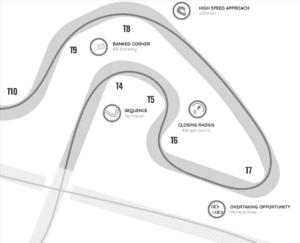
As drivers crest over the crossover, the T4 - T6 sequence comes into view. The track quickly descends where a double apex corner with a curved mid section and heavy corner banking, create one smooth corner where drivers should use the banking to maintain momentum. Turning in too sharp to T4 will set you up horribly for T5 and T6.
On approach to T6, a driver can spot the apex as they come uphill but, with the exit curb completely obscured, drivers will have to commit early in order to maintain maximum speed towards T7.
T7 reflects T9 of the P1 Circuit where a widened corner entry and exit encourage people to take different lines based on whether they are following, defending, or in clean air. As with P1, the exit speed is hugely important as additional speed gained on the exit from T7 will provide a lasting advantage all the way to T9.
4
SEQUENCE 4 (T8-T11)SEQUENCE 4 (T8-T11)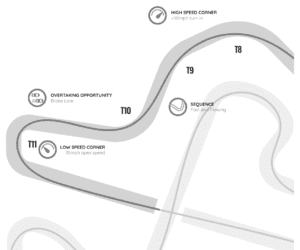
As drivers approach T8, the track starts to climb and provides fantastic views over the T8, T9, and T10 sequences. Drivers will need to be brave and keep the pedal to the metal, using the momentum to carry them uphill.
T8 and T9 combine to make a double apex which can be taken at full throttle, regardless of their line. The key, however, is to open up the racing line as much as possible into T10, so that there is time to set a straight braking zone into T11.
The approach to T11 will be the perfect place to make a dive on the brakes, as the person ahead leaves the inside line wide open to maximize speed around T11.
Victory will be short-lived, however, the longest straight on the track is between T11 and T12 so an easy overtake into T11 will leave the driver slow and vulnerable for the next 800ft (240m), maybe even costing them several positions.
5
SEQUENCE 5 (T12-T14)SEQUENCE 5 (T12-T14)
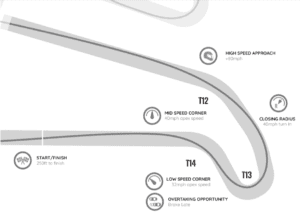
For race karts, the track thunders through the crossover, flat out towards the final sequence.
For national events or club racing, the mini P1 Bus Stop comes off the back straight in a right-left left-right sequence which blends back into the race loop just before T12. In order to maintain a smooth circuit for all users, the bus stop has two low and two slightly off-camber corners which are sure to be a favorite among drivers and spectators as tires squeal while looking for grip. Generous grass runoffs provide space for drivers to give the sequence their all without the fear of hitting hard infrastructure.
For the race karts, arriving at T12 at as much as 80 mph, T12 and T13 combine to make an aggressively sharpening sequence where staying as wide as possible, and possibly even missing T12 Apex, gives you the best opportunity to create a straight line braking point and get back on the throttle early to maximize speed back on to the start-finish straight.
As the final run from T13 to T14 is uphill, it will be hard to pick up speed out of T13, making mistakes into T13 costly, and furthermore, potentially losing the leader of the race on the final corner.
COURSE CONFIGURATIONS
| Karting Full Course | Karting National | Karting Bambino | |
|---|---|---|---|
| DESIGN STANDARDS* | FIA Karting | N/A | N/A |
| TRACK LENGTH | 0.93 mile | 0.87 mile | 410 ft |
| AVERAGE SPEED** | 57 mph | 55 mph | N/A |
| MAX SPEED** | 83 mph | 78 mph | N/A |
| LAP TIME** | 57 sec | 55 sec | N/A |
| LONGEST STRAIGHT | 655 ft | 590 ft | N/A |
| TOTAL LENGTH OF STRAIGHTS | N/A | ||
| CORNERS | 14 | 17 | 3 |
| FEATURES | FIA Karting Paddock & Pitlane | Circuit Crossover | Multiple similarities with the P1 Circuit | Circuit Crossover | Multiple similarities with the P1 Circuit | Simple sequence in good view of clubhouse |
| SUPPORT INFRASTRUCTURE | Primary Competition Paddock | Non-Competition Paddock | Direct Connection to P1 Members Paddock | Primary Competition Paddock | Direct Connection to P1 Members Paddock | Non-Competition Paddock | Drift & Carousel Links |
*Circuits designed to specific FIA standards; FIA homologation not complete | **Based on F2 racecar simulation